
I love my life...
Finding the most whimsical, eccentric, creative, ludicrous works of art is like mining gold to me. I count them as gems in my arsenal of creative treasures, and lose my breath when I see something I've never thought of before...something that sparks my imagination.
Here's my latest spark...
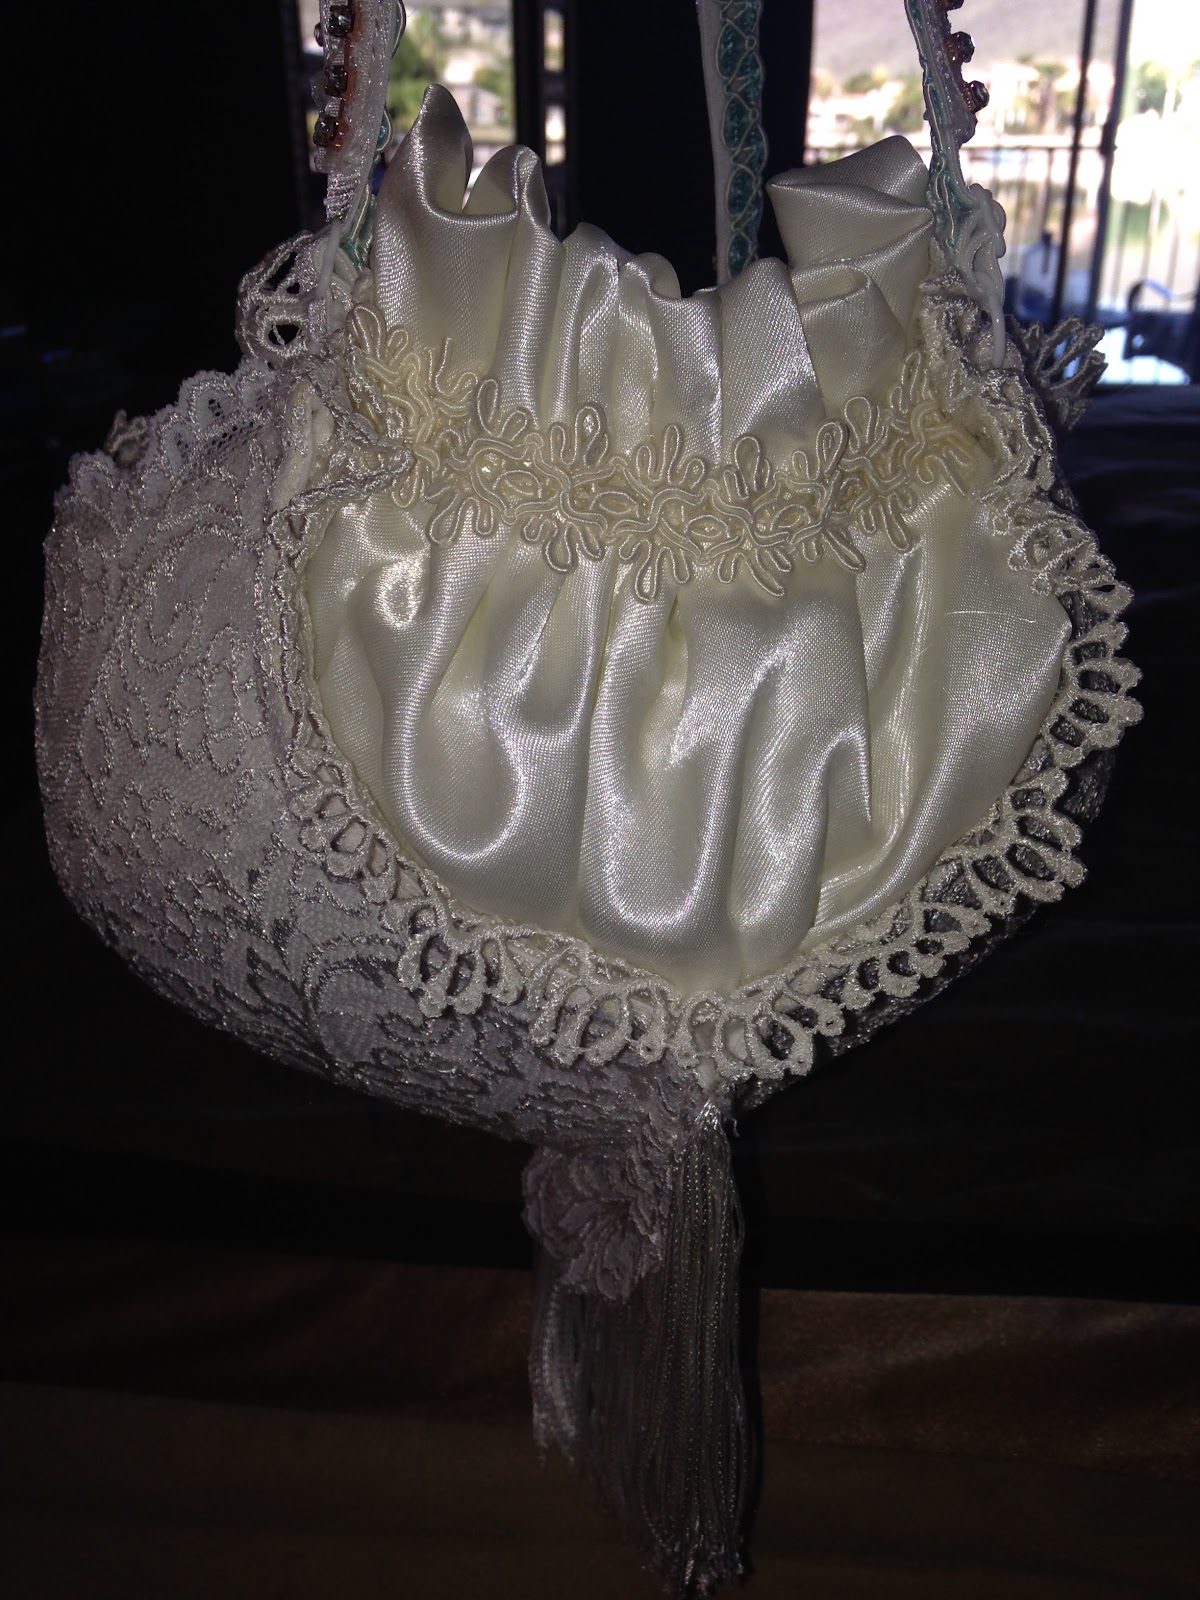
Boudoir Bra Purses!!
Boudoir Bra Purses!!
With a very special bridal shower looming, I thought that a white lace & rhinestone crystals version would be the perfect gift for my dear friend Tina's daughter, Kristi. She is like a niece to me, having watched her grow up since she was 2 years old. I was a bit nervous that it might be so much "out of the norm" that people would think it was weird or crazy...but I loved the idea enough to go for it!
Thinking it would be a perfect "Money Purse" for the special "Money Dance" at the wedding, or maybe just a place to keep her personal things in the dressing room at the wedding site, I thought it was the perfect personal touch that her Auntie "D" could share with her on her monumental day. Even if Kristi only wanted to put potpourri inside of it in a mesh bag to make her room smell sweet, or keep it as "Closet Art" to make her smile, it was the most unusual purse she would ever have, I was sure of that!
I was anxious at the shower, to reveal the surprise gift, and when the time came, the Bra purse was the hit of the party! Guests who had been chattering away, enjoying the party and gift opening, suddenly stopped talking as Kristi lifted the Bra purse from the wrapping, with its rhinestone straps twinkling in the sunlight that cast through the window. Gasps and Ahhs filled the room, with questions and wonderment.
"Is that a bra?!" someone asked, in excitement.
"That is incredible!" someone else said.
"You made it?!" another was impressed.
Tina stood watching and smiled at me, then came over to give me a hug and a kiss, and to tell me how incredible she thought it was. I started to feel silly that I had worried for nothing. The special gift I made wasn't too "weird" or "crazy" it was perfect, and my best friend & her daughter could feel my love! I felt the glow on my face, not with conceit, but with pride in a job well done.
It was then that I saw Kristi's older sister Missy, (who got married 9 years ago) with a begging look on her face, "But I don't have one!"
I had to fight the giggles because I knew I would hear
something similar to exactly what she said, if I was successful. I had already played the scene over in my mind. It was like an invisible pat on the back and it made me smile wide.
"I didn't make them back then, Missy..." I apologized with a big smile, "Otherwise I would have made you one!" I promised, watching as her eyes got bigger and more pouty.
"But I don't have one" she pressed with a twinkle in her eye. "James and I will be renewing our vows for our 10th anniversary this year!" she announced.
Hmm...(wink! wink!)
Hmm...(wink! wink!)
Missy was the ultimate indicator of my tremendous success!
And so it is....
The legacy of the Boudoir Bra Purse has been born!
So what do you think, do you want to make your own Bra purse? Maybe stop traffic when you're out about town?
Give that one-of-a-kind Bridal Shower or Birthday Gift?
If you do, I've got you covered! ;)
Supplies:
*NEW* Underwire Padded Bra
(*firmly padded bras work best to hold shape)
Please do not consider using your "used" bras...there is just no way to explain how bad of an idea that would be...kinda gross...so go check out Walmart, Target, Kohl's, and other inexpensive lingerie retailers to find affordable bras or score big on the clearance rack like I did last week at Walmart (stocking up!) where I purchased beautiful bras to embellish for under $3.00!
Walmart.com has regular priced underwire padded bras with beautiful textures & delicate lace & fun patterns for $3.97-$9.97 full price. So there are affordable options to work with. Its all about the embellishments, even a plain bra can be turned into a masterpiece with the right creative touches!
*Look for bigger cup sizes with firm padding and underwire support (to help hold purse shape) if you prefer greater purse capacity. I used size 42D in this project. Smaller cup sizes will create smaller purse capacity. Tiny bras can create change purses! The number of the bra size doesn't matter because the sides are cut off completely, and that is where the bra number measurement comes from)
Fabri-Tac® clear fabric glue
(or similar strong adhesive for fabric, if you must)
Fabric-Tac® is ridiculously strong and my personal choice!
You can purchase it from Amazon.com: Here
You can purchase it from Amazon.com: Here
1/2 - 1 yard of Satin fabric or choice of lining fabric
(If you want to create a scrunched/gathered purse interior, as done with my sample you will need approx. 1 yard to make sure you have enough, depending on the look you want to achieve.
Embellishments:
Rhinestone Crystal Chain
(enough to trim both of the bra straps)
Approx. 1/4 yard of Fringe
(to decorate the bottom edge of purse, if desired)
Small silk flowers
(to hide back strap attachment)
1-yard of white braided trim (1/2" wide, or as desired)
(to attach along the underwire of each bra cup to trim)
**Various Ribbons, Trims, Braids, Lace, Beads, Crystals, Appliqués, and any other beautiful embellishments you can find to enhance your Bra Purse. Use your imagination and go wild! The more eccentric the decorations, the more extraordinary the Bra Purses get!
**Some embellishments are not seen in photos...I forgot to take the final photos before I gifted it...Duh?!! I will ad them to this post as soon as I attend the wedding in 2 weeks and get photos!
Tools:
Sharp Fabric Scissors
Straight Pins or Corsage Pins
(to secure pieces in place while glue is drying)
Paper towels
(to help with errant glue on your hands!)
Are you all ready to get started?
Okay, Lets go!!

Cut the bra sides off of (the parts that wrap around your body), leaving a lacey bottom edge if your bra has one, if not, just cut close to the underwire edge, but not too close that you cut off the fabric over the underwire.
Cut off the bra straps at the back where they connect, as seen in photo above.


(Above is an example of where to cut the sides off)

(I got so excited making the bra purse that I forgot to take photos of the fringe process on the white one, so here is my purple version!)
Using a straight pin, mark where the center fabric on the bra is so that you know where to stop the glue line for the fringe. If you want less fringe, (or no fringe) adjust your pin placement. I wanted fringe across the entire bottom, so I went from the side edge of the underwire, all the way around to the center where the fabric connected one cup to the other. (see photo above)

Place a generous line of Fabri-Tac® along the underwire edge, from the armpit edge to the center where you placed the pin, just at the place where the center-bra-fabric joins together.

Attach the top edge of the fringe to the glue line (you will notice that the bottom edge of the fringe has temporary stitching that keeps it in place until you gently unravel it, and the top edge has a clean row of loop ends), gluing the top edge of the fringe in place holding in with your fingers to make sure it grabs (being careful because the glue is very sticky!)
Press the top edge into the glue to hold securely. Press down on any puckered areas to make sure it grabs well and there are no gaps. It holds fairly quickly, so pinning in place shouldn't be necessary but if you want to temporarily stick a few pins in, go ahead and do it!
Press the top edge into the glue to hold securely. Press down on any puckered areas to make sure it grabs well and there are no gaps. It holds fairly quickly, so pinning in place shouldn't be necessary but if you want to temporarily stick a few pins in, go ahead and do it!

Allow the glue to dry.

At this point, I like to carefully pull off the bottom guard-stitches from the fringe bottom, because it makes the ends dangle freely and doesn't pull in an unnatural way as it hangs.

Next, add Fabri-Tac® along the top edge of the fringe across to the opposite edge (this is what will glue the purse together)

Being careful to not get glue everywhere, fold the bra cups together with the glue on the underwire edges attaching it securely; Press along the glue edge, making sure the fringe is dangling outside nicely and not caught up inside the glue.
Using straight pins, secure the connection through the underwire edge and allow to dry. Remove the pins within a few minutes as the Fabri-Tac® grabs very quickly and sets up before you know it. If you wait too long to remove the pins, it will get difficult and you don't want them glued in there permanently!


The photos above show the shape the bra purse takes when you glue it together, though this photo has no fringe yet as it was taken while it was pinned in place, but not yet glued.

Using a flat ribbon or lace trim (approx. 1/4" wide) with finished edges on both sides, cut a length the same size as the bra straps. (This will be glued on top of the strap to embellish it once the rhinestone chain has been attached)

Place a line of glue along the center length of the ribbon that is the same length as the bra straps.

Place a length of rhinestone chain on top of the center glue line. Allow to dry. Repeat this process to make one for opposite side.

Pin the cut end of the bra straps to the front edge of the bra, approx. 2" from the center point. (I missed the photo on this step but you can see the placement on the photo below). Glue the strap in place with Fabri-Tac® and allow to dry.

Once the bra straps have been glued in place and dry securely, place a line of Fabri-Tac® down the center of the strap and attach the rhinestone embellished ribbon.
*You can glue the rhinestone prior to attaching the strap, but I find it easier to do if you add the chain after the strap is already in place, before the glue has completely dried.

(Straps are glued to the front center, approx. 2" from the center point)
At this point, I used a padded hanger to suspend the bra purse for future drying and embellishment. With the fringe and the straps in place, I didn't want it to get "droopy" by laying flat on a table. Plus it was fun to see it hanging off my armoire when I walked by!

Because Kristi (the bride) has the color Tiffany Blue as a wedding accent color, I decided to add it as a subtle trim on the inside of the bra straps. It doesn't scream color, it just peeks out in a very sweet way without tainting the "bridal white" effect. I found the trim at a 4 cards for $1.00 bin at my favorite local SAS Fabric store here in Phoenix. Its hard to argue with 3 yards for .25 cents!

After gluing the colored trim onto the underside of the bra strap, I pinned the ends in place for a few minutes to secure, since it was thicker trim and had a bit of a mind of its own!

I just love the way the colored trim adds some personality!
You can see from the photo above, that the purse has a big "dip" area. I will be using gathered satin to make the lining and enhance this area as if it is the back of a luscious bridal gown.
I had considered doing a "lace-up" look here, but ended up dropping that idea when I saw how beautiful the satin looked on its own. I didn't want to make it gaudy and unappealing, but may try the "lace up" look on one of my next adventures!
*TIP: The size of the bra cups will determine how big this "dip" area is. The smaller the cups, the less of an open area you will have, so take this into consideration with you decide which bra to use. I stand in the bra aisle and fold them and play with them to see what I like best...I'm sure people walking by think I am nuts!
*TIP: The purse straps can also be made into a single strap if you prefer it to hang longer when carried (other than doing the double strap as I have indicated in this project) by glueing the ends together to one another, creating a long hanging strap. Then you would want to hide the joining edge by attaching a lace medallion of some sort, or silk flowers. Use your imagination and have fun!
Using a lacey embroidered trim (approx 1" wide) I created a frilly border on the top edge all around the purse, glueing it on the inside edge, over where the straps are secured.
Purse Lining:
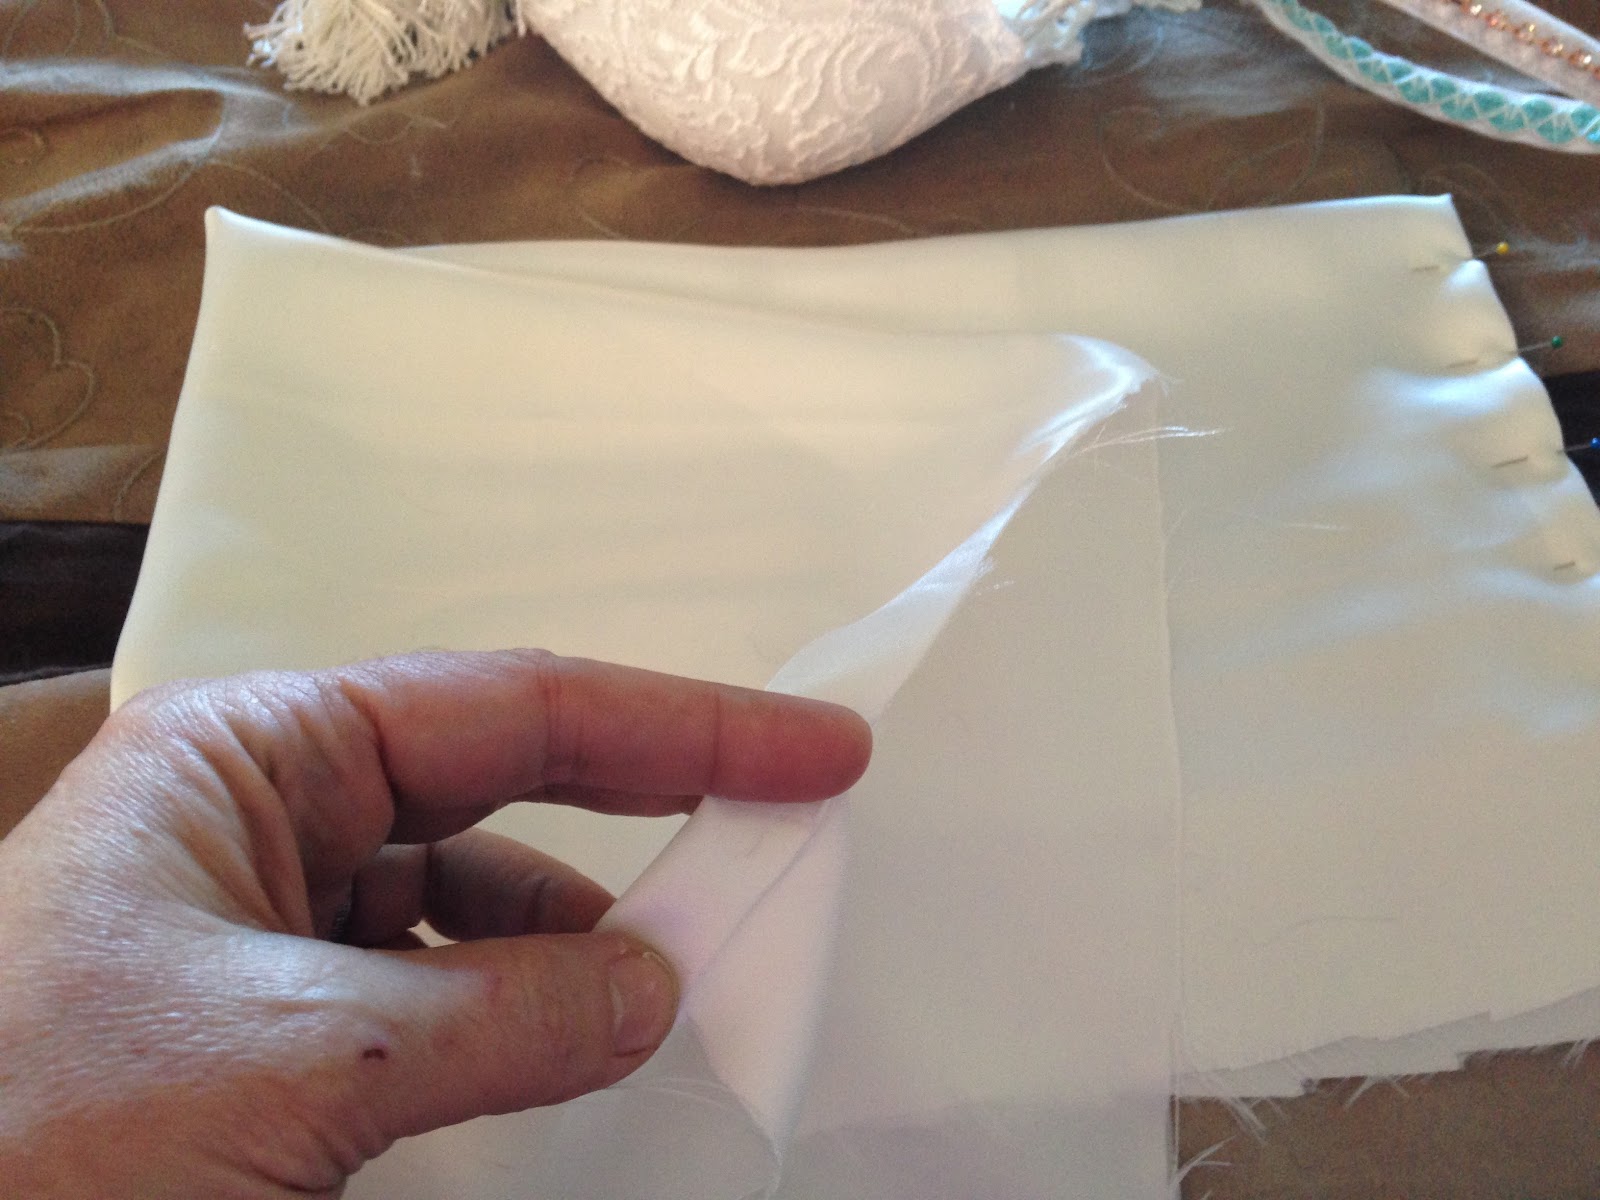
To make the purse lining I first used a piece of satin fabric approx. 12" wide, folded in half, with the raw ends pinned inside itself [prior to folding in half] to hide the raw edges.
*TIP: You need to make sure that your first lining piece is wide enough [after being folded in half] to cover the expanse of the "dip" area in the back. If its too narrow you won't be able to glue the bottom edge to the lower curve of the "dip" area. This can vary in size depending on the bra cup size, so be mindful!

(example of how wide the first lining piece needs to be in order to cover the "dip" area)

In the photo above you can see the side edges folded under and pinned in place, then the fabric strip folded in half.

Using Fabri-Tac® stick the nose of the glue bottle inside the fabric fold in between the pins and squeeze a teensy-weensy dab of glue, pressing down the fabric to secure it. Just little dabs to keep it in place, not too much!

You can see in the photo above, the glue has secured the fold and the top row has the pins removed to show you its not perfectly done, its going to be mostly hidden...

Begin gluing and pinning the pleated/ruffled edge into the purse to form the lining allowing the first row of lining pleats to stick up over the edge, starting at the top edge, beside the "dip' area, making sure the ruffles are approx. 1" above the top edge, so it hangs over.
Place a generous amount of Fabri-Tac® on one side of the upper edge of the purse beside the "dip" area at the back straps; Attach one side of the lining fabric to the glue, pining it in place to secure.
Begin forming the lining pleats with your fingers [and pins to help secure] in a random loose manner...no perfect pleats! Since there is no upper edge of the bra to attach to, just pin the pleats in place and hide small dabs of glue to grab to itself in a hidden way and take it across the "dip" and glue to the opposite upper edge near the strap.

Photo above is taken from the inside view of the purse lining in the area where the "dip" is, with pins to secure until it holds.
There is no perfect way to describe this process, its one of those things you have to play with, to get the full idea. You just want to make sure to cover the "dip" opening, hiding any raw edges from showing on the front side. Anything that seems unsightly on the inside will be covered with subsequent ruffle strips.
Place a line of glue along the lower curve of the "dip" area and use your hands to press the lower edge of the fabric into the glue, trying to maintain a loose gentle ruffled appearance. You don't want any holes, you want a solid connection for the lining.

Though it may look like the lining is attached throughout the purse in the photo above, at this point the first folded strip piece is only attached at the top bra edge on either side of the "dip" area & along the bottom curve.
Next, I added lining strips in ruffled/pleats around the top edge of the rest of the purse, continuing the process as before, but using smaller strips that don't need to cover as much territory.
Place adhesive in the spots you want to secure the fabric as you go. Continue gluing in folded strips with Fabri-Tac® placed in needed areas, creating pleats/ruffles in a random manner that circles the interior of the purse, coiling downward towards the center base. Use straight pins to secure the ruffles in place until they are secure. Be sure to hide any raw edges from the previous row of strips, by glueing on top of the lower edge.
When you get to the very bottom of the purse lining, if you need to hide any visible raw edges, you can cut a circle of satin fabric (approx 6" in diameter) then gather up with running stitches along the outer edge, pull up to make a gathered circle, and use that to glue to the bottom of the purse for a circular counterpoint that will hide any unsightly leftovers!
Embellishment:

To hide the irregular glue line that the pleats formed along the "dip" area, I glued a strip of woven trim and it finished it off perfectly.
To hide/conceal the bra strap mechanisms that were on the front of my straps, I glued decorative silk flowers on each one, using Fabri-Tac® (I've got to say that stuff glues like a champ!!) Pin the silk flowers in place to keep them from wobbling to the side, but don't wait too long or you'll have a tough time getting the pins out! (Experience is telling you this!!)
I added additional creative "jujje" to the bra purse, embellishing the bra cups with woven braid trim that followed the underwire edge curve from front to back on both sides of the bra. It is subtle when added to the white lace bra, but adds richness to the design. I also glued some beautiful lacey appliqués to random areas on the cups to add delicate details. You could also add tulle gathered flowers, pearls, lace, crystal beads, and anything your heart desires!
Thinking that something was still missing, I decided to add a giant Austrian Crystal Rhinestone to the center (just above the tiny rhinestone detail that the bra already had on it) to make it look like a wedding "Diamond". It was the perfect "cherry on top" to finish the Boudoir Bra Purse off right!!

So what do you think?
Can you live without one of these?
Maybe you have a special Bride you want to surprise?
Have fun and let your imagination go wild!
I will be offering more Free Tutorials to make your own Boudoir Bra Purses in whimsical styles that will make your heart sing, so stay tuned and be sure to subscribe so you don't miss out!
(email subscription form is on the upper--right-side of this page)
**I respect your privacy and never sell or rent your information!
I would LOVE to hear what you think about this project, so leave a comment below! And be sure to post photos if you make your own Boudoir Bra Purse!!
With Sugarplum Hugs & Crazy Ideas!!
Deanne