Showing posts with label Snowman. Show all posts

Monday, March 10, 2014

Let It Snow!!

Okay..I know I live in Phoenix, Arizona, where snow is reserved for snow-cones and not for sidewalks, but I can dream can't I?!! 

I'll just have to stick with glitter...and that's totally fine with me!

I love glitter. 
Reeeeally LOVE it...Like, I could probably find my bliss if I coated everything in my life in sparkly bright colorful flecks of metallic shimmeringness! 

(Is that even a word?!!) 

Yes, because I say it is...

So you can imagine the holidays at my house, I'm guessing? Yup, glitter EVERYWHERE!! Not necessarily on purpose, though...my hubby is getting a little annoyed at picking it off his own face...we aren't quite sure how it gets there, but it does! 

(Insert sinister "glittery" laugh here!)


I don't think I mentioned in my previous Snow Folk Jars post, how I made the arms, or in most cases they look more like "angel wings" making them "Snow Angels" instead of mere "folks"!!

I used a 1-inch wide strip of neutral or cream colored woven fabric to initially wrap around the jar neck, right where the head is glued on (after paper clay dries completely). I put a generous amount of tacky glue onto the glass, then started wrapping the fabric around, adding more glue as necessary. 


After the first few wraps, I glued and tightly attached "arms" with a tight wrapping several times around, adding glue to secure. I wrapped the various jars with different amounts of fabric, depending on the bottle shape. They told me when to stop! 

You can use any kind of (non-stretchy) fabric for the wrapping. You can even use burlap for a more "earthy" look, which would be adorable! Once you add the glittery "snow", even a colorful printed fabric would be fun and festive! 


For their "arms" (or Angel Wings), I used "crystal & pearl" beaded floral sprays and glittered fruit & leaf sprays, which I found at the craft store in the holiday floral trim section, but you could just as easily use small twigs and branches from your yard!

To add extra embellishments, I used "Eyelash" yarn (found in every craft store I've ever been in, at the crochet/knitting section), to wrap around the base of hats and at necks like "scarves" for an extra frilly look. I also tied jingle bells, tiny charms, and other trinkets 
around the necks, adding personalized name beads or words like "love", "peace", & "joy", for a special touch.


Today, it's time to "Snow" Glittery Wintern-ess onto my desert-born Snow Folks, and they are quite excited about it.


They're cute enough without the glitter...really they are...no one would even miss the glitter, I'm sure...but leaving off the sparkles is like giving someone a cupcake without frosting, and we certainly can't allow that, now can we? NO! Of course we can't!!


So, here is one last look at them before it "Snows"

(And if you are one of my "beloved's" and happen to see your name on a Snow Folk....it's just a figment of your imagination!!)


I used Liquitex Clear Matte Medium to paint onto the areas that I wanted the "snow" to stick. You can coat the entire head and body (leaving the glass jar clean for viewing contents), or you can just dab the stuff in random places, then sprinkle liberally with iridescent or white snowflake glitter. I like to use various types, colors, and sizes of glitter (as your imagination desires), to give a varied "snowflake" look. 


The "snow" becomes a way to unify the design, bringing all the kooky accessories and embellishments together into one cohesive design and display.


As you spend the next year gathering your doo-dads and accessories for next years Snow Folks, (and I promise you will not be able to get these cute guys out of your mind!)...don't limit yourself...think outside of the box...(toy blocks and tinker toys make great hats!)...check clearance aisles in craft stores, Party stores (for cheap kids toys and party favors), flea markets, garage sales, antique stores, hardware stores, your hubby's garage junk bins, Dollar stores, YOUR OWN CRAFT CLOSET!!

The embellishments can be anything you want or imagine...once you "glitter-ify" everything, you'll look like an Altered Art Genius to your friends!! There are no mistakes!

The ornate silver "hat" I used on one of my Snow a Folks, is actually the top of a perfume bottle that had long since been used and thrown away. But I kept the beautiful bottle top, thinking that some day I'd come up with a crafty way to use it...and I did! I absolutely lalalaLOVE the way it looks! 


(So this officially establishes me as a hoarding "enabler" as I encourage you to never ever throw out anything you might be able to use as crafting supplies....EVER!!)

But please don't tell your loved ones I'm to blame, okay?!! I have enough to deal with, just keeping my hubby from launching into orbit over my piles!!

I save anything and everything that has a remote possibility of being used in the future in one of my projects...the real problem is that I have NO LIMIT to the varied art forms, mediums, and avenues of creativity that I travel and explore, so my heaping piles of stashed supplies are growing endlessly...but it sure makes for great "shopping" in my own craft closet!


I hope you have enjoyed my adventure in "Snow Folk Jars" with me. You can find my original article on starting them HERE


With Big sugarplum Hugs!!
Deanne


Thursday, November 7, 2013

Altered Art: Snowman Bottles & Jars

I have this thing about bottles and jars. 
A BIG thing. 

All kinds. New ones, old ones, big ones, small ones, clean ones, dirty ones...They ALL get me excited!! 

Whether it's to make jams & jellies (pomegranate jelly is my favorite) or to create a delightful piece of jewelry using a teensy-weensy jar with wondrous minuscule contents or to make a fabulous "faux" Snow-globe creation using the big 'uns with fun miniature scenes inside...they all float my boat BIG TIME! 


I've been planning these snowmen for months. 
YEARS, actually. I finally started them last December but couldn't finish in time for the holidays so they sat patiently waiting for me. 

Sorry, Frosty! :/

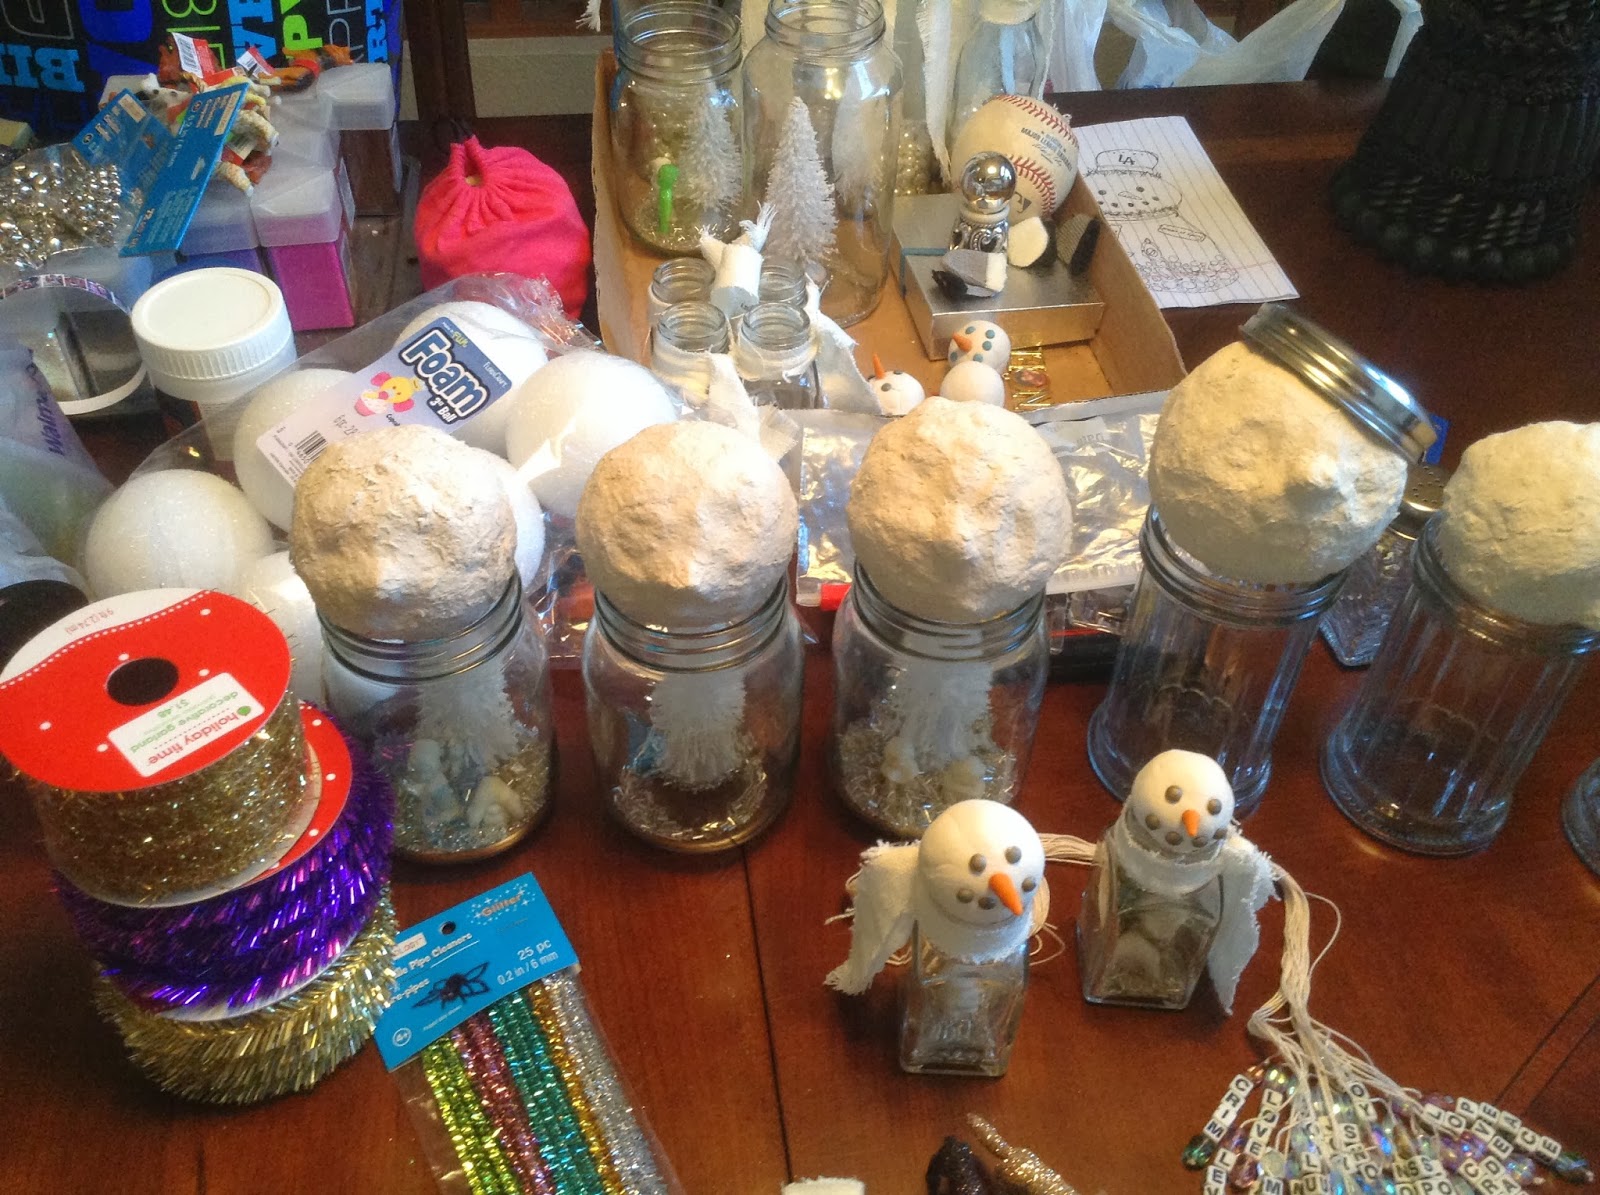
So here is my crafting table of "Snowman-ia"  


I guess this certifies me as an official "Snowmaniac"?!! 
(My hubby is convinced!)


The teeny jars are from Tim Holtz scrapbooking supplies, that were purchased from my local Joann Crafts store. I sculpted tiny polymer clay heads to suit each jar size, using white (oven-bake Fimo polymer clay) for the heads and orange clay rolled into tapered cone shapes for tiny "carrot" noses. Then I made black clay specks or tiny "balls" for the "Coal" eyes and mouth. You could also use tiny rhinestones or glass beads to simplify the process.


They were baked as directed on the package (though I tend to lower the oven temperature when I bake my minis so they don't get burnt, or "tent" the items with foil to protect them). It isn't a bad idea to paint a coat of Mod Podge or Polymer Clay Matte Finish Glaze over the head to add extra security to the facial features. I suggest this because I have a faceless snowman head to show for my woe!


The tiny jars were filled with luminescent glass bugle beads and iridescent seed beads for simulating sparkling "snow", then the heads were glued in place on top to seal the jar. I use Aleene's tacky craft glue with great success. E6000 glue would also be a great choice. (The tallest tiny jar is actually a mini Tabasco bottle I've been saving for 10 years for just the right project!)


Before I finished embellishing the snowmen heads, I wire-wrapped 18 gauge wire around the bottles glass neck several times to secure it, then I formed a loop at the back, so it can be worn as a pendant or hung as an ornament. I made reeeeally long noses that probably won't survive being worn very long, so next time I'll be making "stunted" carrot noses! Lol


Once I had the wire securely in place (you can put a dab of glue for extra security), I finished the embellishments on the heads. Colorful metallic threads, yarns, and trim make great neck scarfs! For cute hats you can roll tiny "cones of wrapping paper to form pointed "party" hats in holiday designs, or use various mini silk or paper flower embellishments, mini hat charms, etc. 

Use your imagination and go wild!

To add a touch of glitzy "snow" Liquitex Matte Gel Medium (found in the fine art painting aisle at the craft store), and paint all over or just random blotches on your snowman's head, hat, neck and scarf, then immediately while still wet, sprinkle sparkling white or translucent iridescent glitter over it for the appearance of "snow".


There is no end to the possibilities...


And now, on to the Big a Boys!!!


As I mentioned in a previous post, I've become a hoarder of glass jars and bottles. My conscience for recycling coupled with my crafting obsession has created a monster! My box of jars has grown so much that it is overtaking my craft closet...I must do something about that...it is completely unacceptable...please remind me when it's time for Spring cleaning...Yes, I do believe I must hold a jar crafting "sit in"!!

Anywhoo....

On to my big Snowmen...


These particular Snow Boys utilize the bottles I have recycled, such as barbecue sauce bottles, vinegars, etc. They have long narrow necks which aren't suitable for embellishments within, but look fantastic when filled with Pearls, Crystals, Beads and Glitter. 

The outer trimming and embellishments make these Paperclay Snowmen special in a more a Artsy-Fartsy Shabby Chic kinda way. I la la la LOVE these guys!!

The bottles were first thoroughly washed and dried, removing all residual food odors...(who needs a snowman that smells like vinegar, right?!!) 

The heads were sculpted (loose exaggeration!!) by rolling Paperclay into balls that were proportional to the size of the bottle it is to belong to. Paperclay is a product sold near the polymer clay in craft stores. It is very smooth and creamy white, and air dries. It is smoother than Celluclay papier-mâché (which is what I prefer to use for my bigger Mason Jar Snowmen). 

I didn't use a styrofoam ball center because these particular heads are only about 2-inches in diameter, and though it took several days to dry completely, they didn't crack too much, which I had been worried about.

For the noses, I sculpted "carrots" from Fimo (orange) oven-bake clay, then baked them and glued them to the heads using Aleene's Tacky Craft Glue. You could also sculpt a "carrot" or "nose bump" from Paperclay and then paint it orange. 

For the eyes and mouth I used those paper fasteners by Tim Holtz (used in scrapbooking to attach multiple papers together) and I just stuck the ends into the clay while it was still soft. Then I let the heads dry completely.

After filling the bottles to the desired fullness with various size faux pearl "snowballs", iridescent beads, and snowy-ish baubles, I glued the head in place, making sure not to let the glue run down the inside of the bottle neck.

Now comes the fun!

To accessorize the snowmen, I first made (or found) a hat...every self-respecting snowman needs a hat, right?!! There are endless ideas for hats. I use everything from cake decorating tips (which are perfectly cone shaped, shiny silver, and even have a hole in top for adding extra embellishments), to kitchen gadgets or broken toys, holiday wrapping decorations, etc.

 Another great idea for hats is to use the clipped finger ends of old worn out knitted gloves, to use them as "knitted caps". Just roll up the bottom edge like a cuff and voila you have a knit cap!


...And every snowman needs a scarf, don't forget that!! 


You can crochet or knit one, (if you're feeling über-inspired!) or you can tie strips of fabric, trim, lace, etc., around the bottle neck, to give your snowman that cozy feel. I like to use the "eyelash" yarns to give them a frilly look, and extra neck wrappings of metallic pipe cleaners for a festive appearance and fun swirly curly wired curlicues for interesting shape. 


Once you have all the trimmings in place, it's time to "Let it Snow".
Using Liquitex Matte Gel Medium, dab splotches in various places that you want the sparkly "snow" to stick, then sprinkle liberally with iridescent clear glitter "snow". 

Allow to dry completely for several days to insure a solid structure.


For my "Snowman Dream" Jars, (using large Mason jars), I have created a faux snow globe effect (without the liquid). Using mini holiday decorations, I create scenes within the large Mason jar. Glittered animals, tiny snow babies, sparkling trees, wrapped gifts, it all looks amazing inside of a snowman's tummy! Once you start, you can't stop!! At least, I can't stop!!

Once the little scene is in place (glued securely with E6000 or Tacky glue) I glue a layer of additional glitter or sparkly beads to cover the bottom of the jar evenly.

For the Snowman heads on the big Mason jars, I use Celluclay (paper mâché base powdery substance that mixes with water to form a moldable air-drying clay) to cover styrofoam balls in the appropriate size to fit the jar. For quart size jars I used a 3-inch styrofoam ball then covered it with approx. 1/2-inch of papier-mâché over it. The styrofoam ball helps with quicker drying time,  and assists in preventing cracks when drying.

The Celluclay papier-mâché leaves a rough textured surface (compared to Paperclay which is smooth), and I really like the texture for the big snowmen. 

For the nose, I add a small raised "bump", which I paint orange for his "carrot" nose, once the head is completely dry. For eyes on these guys, I like to use black 10mm rhinestones (plastic ones that come in asst. sizes), and for the mouth I use 4mm black rhinestones placed to create a happy smile.

Once the paper mâché is totally dry, glue it securely to the jar opening. If there are gaps, they can be disguised with "scarf" placement. I embellished my chilly pals with random unexpected charms and accessories. A broom made from a cinnamon sticks and twigs inspires endless possibilities!


To personalize my Snowmen I made beaded namesake charms using alphabet beads and crystals to trim. Trim, lace, ribbon, and charming embellishments add whimsy and style.

Snow accents are created as for the previous snow folks, with glitter over Liquitex Matte Gel Medium, finishing off the paper mâché Snowmen (& Snowomen, too, of course!) with fanciful twinkling wonderment to delight one and all!!


I hope you have as much fun making these Snowman Jars as I did!

With Sugarplum Hugs,

Deenie

PS. Be sure to comment below and let me know how your snowman jar crafting is going for you!